I have so many things to post now, that it's hard to keep it down to one project per day, but I have to, because they're all big post, many steps, lots of photos kind of projects. All the things I've been working on for the last month are finally being completed. It feels good to cross these off the list. I will probably be posting about the Harry Potter party well into next week. I hope it looks as impressive as the work load. I am very glad that I started so early, though. That helps a lot.
Anyway, lets get down to the tutorial.
This one is pretty easy and almost cost free, if you already have things like recycled bottles, a little glue and paint, a color copier and random ingredients. I used this tutorial for aging bottles and it really served as my jumping off point. She has a label download that is great, but which I didn't use.


You don't even need to use paint to age the bottles. Just some white glue will give it a different aged appearance. I wanted all the bottles to look a little different, as if they came from different wizard shops, so I varied the treatment, with different paint colors and heavier or lighter applications. Some bottles already looked antique, with tinted glass or, in the case of one bottle I found in my basement, ACTUAL dust, so I left them.
Oh, and to combat the shiny or printed twist tops for some of my bottles, I just painted the tops with matte black craft paint. I thought about covering them with fabric or trying to find corks to fit many bottles, but in the end, I went the easy way out and just painted the tops. There were enough variations that the black tops kind of faded into the background.
I was also creative with my bottle choice. Not only did I use bottles from my recycling bin, but I also found containers at thrift stores and at least one of the bottles is actually a vase in which I stuck a wine cork. This kind of creativity, looking around the house and seeing what can work for the project is actually the best thing about this endeavor. And is quite necessary, when it comes to the next step.

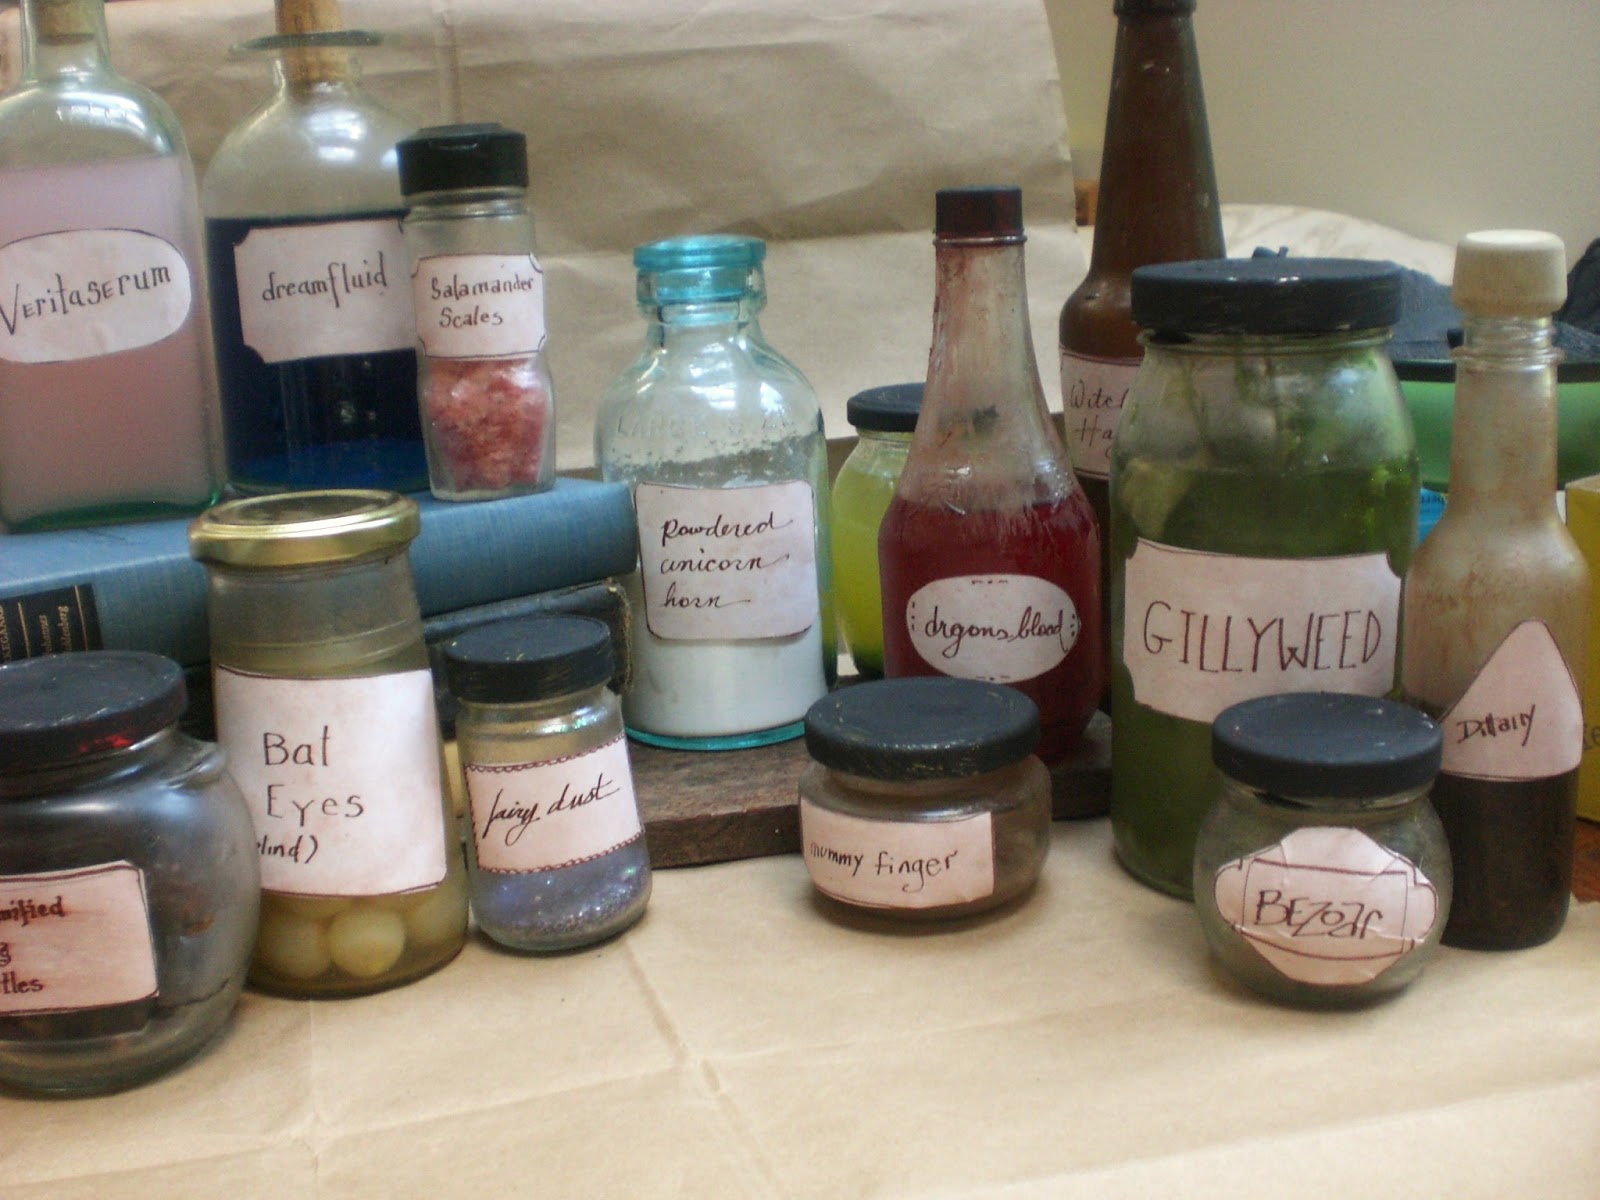
Filling the potion bottles with potion ingredients.
I am assuming that no one reading this actually has a cupboard full of bat wings and bezoars... so what you need to do is look around your cupboard and find interesting, mysterious or unidentifiable ingredients. I found ingredients in three places. My kitchen, my garden and my craft cupboard.
A good thing to do is to go into the pantry and look for some of those things I rarely use, like a jar of pearl onions or the stub of a piece of ginger that was dehydrated. I got some ideas for these from pinterest, but after that, I just fudged things.
It almost doesn't matter what you put into the jars. Once you put the labels on, the names you give your ingredients with suggest to the brain what is inside the bottles and they will become magic. It helps if they are less familiar, but say, what if you fill a jar with half milk and half water? Who is to say what the white, milky, semi translucent liquid could be? Of course, I wouldn't want to leave that out more than a couple hours.
But that brings us to our next step. Labels!

This is a multi step part of the process, too, but it is one that can be useful for more than just one thing, so it's worth it to give it a try. First I started with my tea/coffee stained paper that I used for my invitations. It is just copy paper soaked in a combo of tea and coffee and left to dry in the sun. I took my favorite sheet of stained paper and I photo copied it on my color copier. On the copy, I took my brown calligraphy pen and drew out some interesting label shapes, creating borders or flourishes on some. I was inspired by this label sheet, which you could just download, actually. But I made my own and then I photocopied that label sheet again. (I did this, because I am planning to use these labels for other parts of the party, like the sweet shop, and I don't want to draw more labels, in the interest of saving time and effort.)


I'm particularly proud of the dream fluid. It's such a pretty color and in such a pretty bottle (this one is the vase with cork. I think they look pretty good. And mysterious. So mysterious that I will give you a key to my ingredients.
Veritaserum: some kind of pink lemonade drink that no one in my family actually likes and has been in my refrigerator far too long.
Dream fluid: water with blue food coloring, that's it.
Salamander Scales: pink mica glitter (that container is going back in my craft cupboard just as it is, after the party)

Powdered Unicorn Horn : baking soda
Dragon's Blood: Water with red food coloring
Mummy Finger: dried piece of ginger root
Gillyweed: yard weeds in water with a few drops of green food coloring
Bezoar: garden gravel
Dittany: coffee

Bat Eyes (blind): pearl onions
Fairy Dust: mixed color glitter left over from projects for my daughter's birthday in March.
Witch Hazel: I think at this point, the witch hazel is just an empty dark brown beer bottle. I should probably put something in there.
I also am using the meditation jars that I made for my kids months ago. I didn't put labels on them, because I think they are better clean, so that you can actually shake them and look into them and perhaps find a prophecy. Perhaps they shouldn't be in with the potions ingredients at all.


No comments:
Post a Comment